
What It Takes to Install a Pop Top
It's a Question We Get a Lot
About half the people who contact us are asking about pop-tops. Can you put one on my van? How long does it take? How much does it cost? These are reasonable questions. The answers tend to surprise people, because a pop-top installation involves more than expected.
The reality is that you're cutting the roof off a vehicle and rebuilding it into something that opens, closes, seals against weather, supports a sleeping platform, and looks like it belongs there. It's a lot of work.
If you're still deciding between a pop-top and a high roof, we have a separate post that walks through that comparison. This blog picks up after you've made that decision. Before we get into what the installation involves and why it costs what it does, let’s review why you might choose a pop top.
What a Pop-Top Gives You
The reasons people come to us for a pop-top tend to be specific. In over 30 years of building these, we've heard them all, and they cluster around a few core problems people are trying to solve.
Standing headroom without the permanent height. A high-roof van gives you standing room all the time. A pop-top gives you standing room when you're parked and a standard-height vehicle when you're driving. That difference matters more than people think. It affects how it drives where you can park, what garages you can use, and how the van handles in crosswinds at highway speed.
Extra storage space while camping. Once you are at your campsite, some people like to pop the top and stow food and other gear on the bunk platform, creating more room in the van for living.
Garageability. This one comes up in nearly every conversation. Many people want a camper van they can park in their home garage. With a pop-top down, the vehicle sits slightly higher than the van's stock height. For a Toyota Sienna, that means it fits in a standard residential garage.
For a low-roof Transit, it depends on the garage. The added height of the closed top means you'll need a taller-than-standard opening, so it's worth measuring before you assume it fits.
The upcoming Ram ProMaster City, arriving Q1 2027, is another platform we expect to fit comfortably in a standard garage with a pop-top down. Read our post about the 2027 Ram ProMaster City here.
A second sleeping area. The pop-top platform creates a bed above the main living space. For families with kids, couples who travel with friends, or people who just want to keep the lower area clear for cooking and hanging out during the day, this changes the layout math completely. The bed goes upstairs. The cabin area is available for lounging and cooking.
Fuel economy and driving feel. A pop-top van drives like a regular van when the top is down. Lower wind resistance, better fuel economy on the highway, and none of the top-heavy feel that can come with a full high-roof conversion. For people who use their van as a daily driver, this is a real consideration.
Fitting in where a tall van can't. Parking garages, drive-throughs, ferry height restrictions. A pop-top van navigates all of these because it presents like a stock vehicle when closed. People who split their time between urban driving and camping tend to value this more than they expected.
What Happens When You Cut a Roof
Here's where most people's mental picture of a pop-top installation diverges from reality.
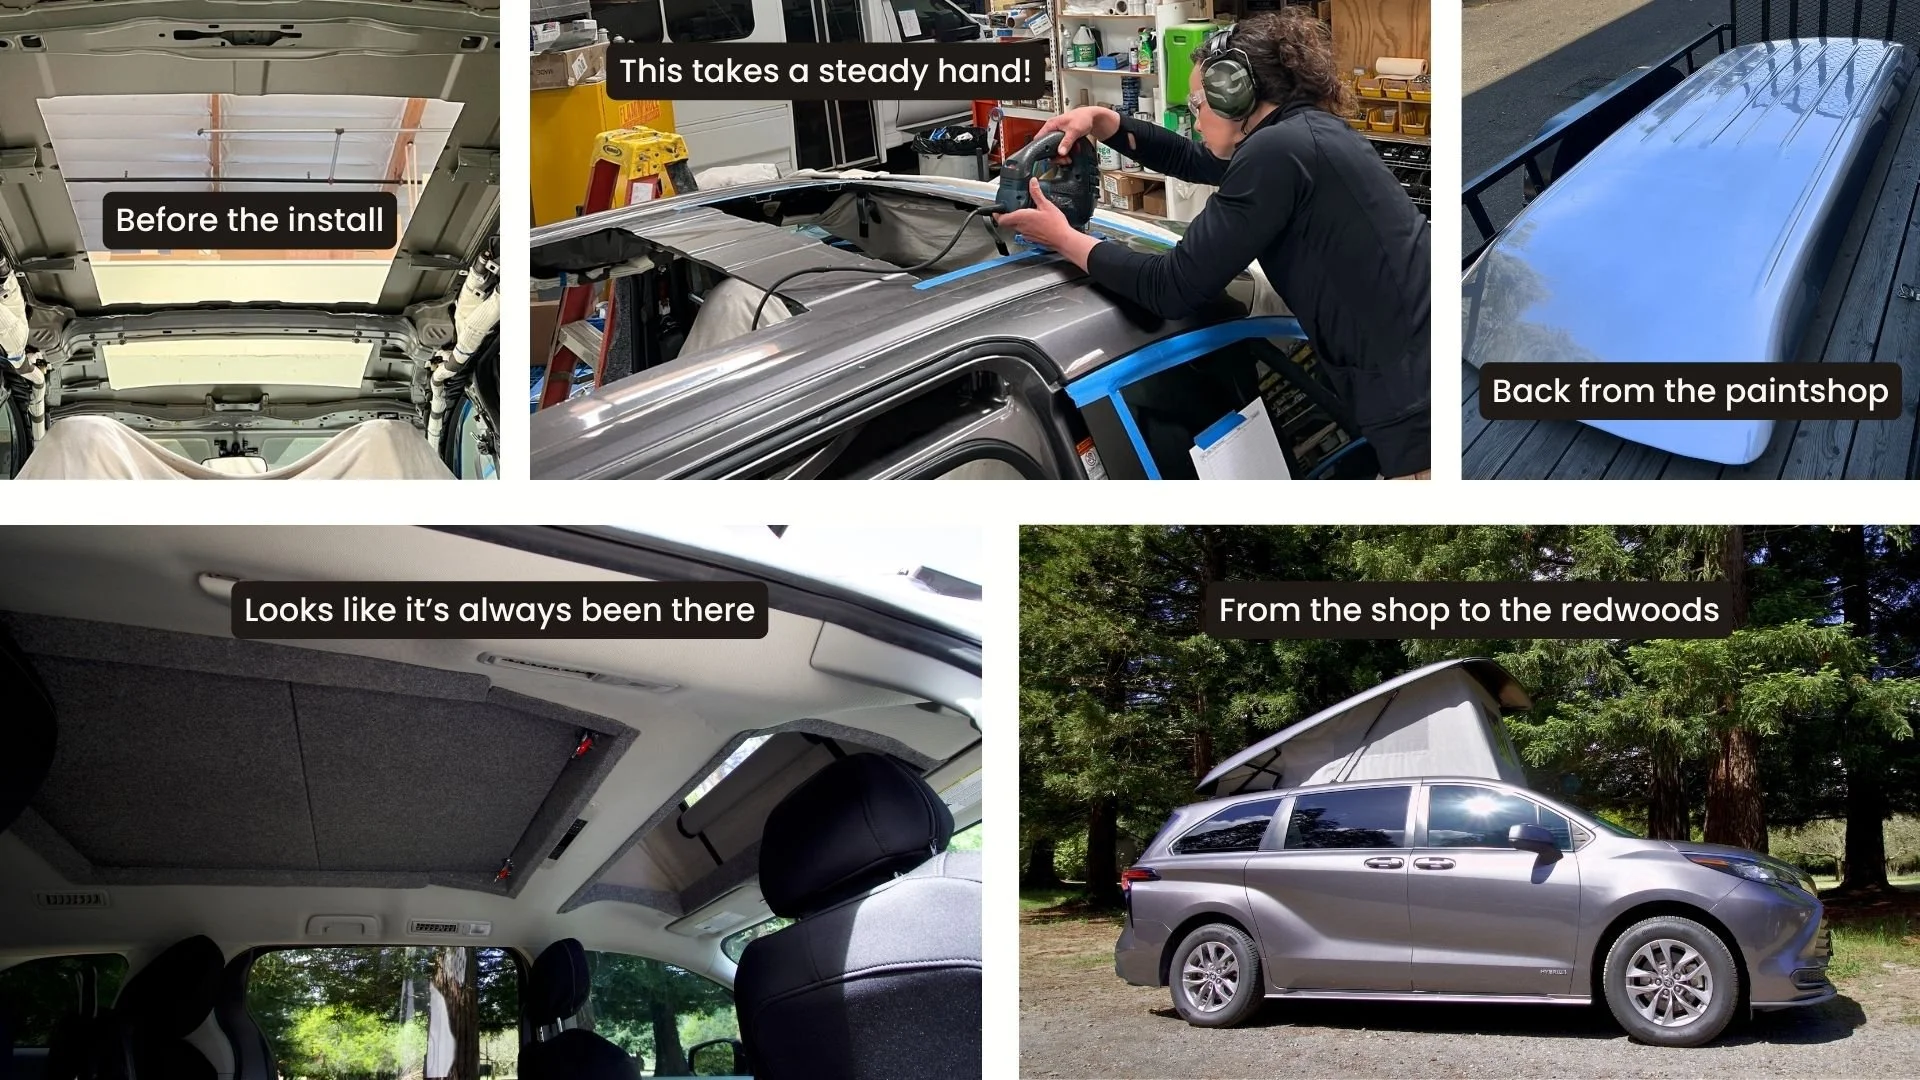
The common assumption is that a pop-top is something you bolt onto the roof of a van. Like a roof rack, but bigger. The actual process starts with cutting a large section of the vehicle's roof out with a cutting wheel. The cut is planned to avoid the van's supporting columns and structural beams, so the vehicle's integrity is maintained as much as possible.
But everything that follows is about building a completely new system into that opening: support frames, hinges, struts, weatherproofing, and a new fiberglass top that needs to function as a reliable mechanical system for years.
Before the saw touches the roof, the entire interior of the van needs to be protected. Seats come out. The headliner comes out. Glass, plastic trim, the dashboard, thresholds, all of it gets taped and covered. Metal shavings from a roof cut can damage surfaces, short out wiring, and embed in upholstery in ways that are nearly impossible to fix after the fact. The preparation takes longer than most people imagine, but is an important first step.
The cut itself has to follow precise markings. After the cut, the raw edges get filed and painted with a special paint to prevent rust, and sound-deadening material goes onto the frame where it will make contact with the new roof structure.
Then the real assembly begins. Front and rear roof frames are installed using rivets and bolts to secure the perimeter of the opening and provide mounting points for the top. These frames are what hold everything together, and they need to be right. Strut mounts go in next, which is where the gas cylinders will attach to lift and hold the top open.
The geometry of these mounts is important. If the angle is off, the struts either can't generate enough lift force to open the top or they push in the wrong direction. We'll come back to this.
The Pop Top Goes Through Its Own Process
While the van is being prepared, the fiberglass top goes through its own sequence of work, often at multiple locations.
We have proprietary molds that we keep at a local fiberglass shop. They lay up the tops, and we bring them back to our shop to trim them to the exact contours of the van's roof. The roof hinges are mounted and located onto the roof of the van.
If the owner wants the top color-matched to their van (which most people do, because a white gelcoat top introduces frequent maintenance and is cosmetically unpleasant), it goes to a local auto body shop for paint matching.
While the top is out for paint, a local seamstress sews the tent fabric and cushions for the upper bunk. Every set is made to order.
This back-and-forth between our shop, the fiberglass shop, the paint shop, and the seamstress is part of why the process takes the time it does. Each handoff involves coordination, cure times, and transport. There's no way to collapse those steps without cutting corners that would show up later.
Bringing It All Together
Once the top is painted and ready, the final installation phase is where everything comes together.
Roof tracks get installed if the owner wants them. If a fan is being added (we recommend one for ventilation), we cut an opening into the fiberglass top, glue in a wood mounting ring, and wire the fan into the van's electrical system. Lighting in the pop-top area requires its own cutouts and wiring as well. The underside perimeter of the top gets painted. Foam gaskets go on the leading edge for weather sealing.
Then there's the tent. A pop-top's tent is what connects the raised fiberglass top to the van's roof, creating the enclosed sleeping area. Once the top has been properly prepared, the tent is carefully attached to both the top and then to the roof of the van. Gas struts get installed onto the strut mounts. If the roof and tent pass inspection at this point, the tent is caulked and given enough time to fully cure before it can go through final testing.
Roof latches get installed so that the top can be secured for driving. For certain models, a bungee cord gets added to the rear of the tent to help pull the tent in while the top is being lowered. The factory headliner gets reinstalled around the new roof opening, and custom trim channels to bridge the transition between the original ceiling and the new opening are fabricated. Ant wiring gets routed through drilled holes in the ceiling to connect lighting and fans to the van's electrical system.
The upper bunk panels go in, and the custom-sewn cushions from the seamstress get fitted. Then the van gets cleaned, the system gets fully tested and inspected, and the seats go back in.
The broad sequence is similar across platforms, though each one brings its own set of details to work around.
Different Vans, Different Challenges
Not every pop-top installation is the same. The platform changes the work in ways that aren't always obvious.
Ford Transit pop-tops are common, partly because the Transit's flat roof profile makes it a clean platform for the cut. Low-roof and medium-roof Transits are the usual candidates. Some shops will do a high-roof Transit pop-top, but that's less common because people choosing a high roof usually want permanent standing height and don't need the pop-top's flexibility.
Ram ProMaster installations work well on the low-roof 1500 models. The ProMaster's front-wheel-drive layout and lower load floor give it a different interior geometry than a Transit, but the pop-top process is similar.
Mercedes Sprinter pop-tops exist on the low-roof models, though the Sprinter's popularity as a high-roof platform means pop-top demand is smaller. The engineering is sound, but the market has tilted toward full-height Sprinter builds.
Toyota Sienna is where pop-tops get interesting from our perspective. It's a minivan, not a cargo van, and the roof structure, interior trim, and electronics are fundamentally different from a commercial vehicle. There are airbag sensors, factory wiring harnesses, and a headliner system that all need to be carefully navigated during the cut. The Sienna is currently the only minivan we convert, and the demand is strong. The Sienna is one of the most-requested platforms we hear about, and most of those inquiries are about pop-tops. The combination of hybrid drivetrain, standard all-wheel drive, and garageability with the pop-top down makes it very popular.
The Ram ProMaster City (arriving Q1 2027) is a platform we're already doing design work on. It's a smaller commercial van, closer to the now-discontinued Metris in size and role, and we expect pop-top conversions to be a significant part of what we build on it.
Custom platforms are a different story. People sometimes ask us about putting pop tops on Highlanders, Caravans, Pacificas, Odysseys. Some of these requests are doable. Some aren't. The challenge with non-standard platforms is that nobody has solved the engineering problems yet, and that work can be cost prohibitive for a custom application3. There's no production pop-top designed for a Toyota Highlander, for instance. The roof geometry is different. The bed length is smaller than typically needed. The strut mounting angles are different, and the lift mechanics are less than ideal.
Gas strut geometry is one of those things that seems simple until you try to make it work. When a strut is mounted nearly horizontal (as it is when the top is in the down position), the upward force component drops dramatically regardless of how strong the cylinder is. The problem is pure physics, and adding a stronger cylinder doesn't solve it. We've explored electric lift systems for situations like these, but the syncing challenges between multiple motors and the initial-lift geometry issue haven't been reliably solved at a price point that makes sense. These are the kinds of engineering constraints that determine whether a platform gets a pop-top option or doesn't.
Why a Pop-Top Costs What It Costs
People who look into pop-top pricing for the first time can sometimes experience sticker shock. We hear it regularly. Some folks come in with an expectation of a few thousand dollars, and the reality is significantly more than that.
Professional pop-top installations across the industry typically fall somewhere between fifteen and twenty-five thousand dollars depending on the platform, the manufacturer of the pop-top unit, and the options included. That range reflects the scope of work: a manufactured fiberglass top, professional installation by experienced fabricators, structural reinforcement, weather sealing, electrical integration, paint work, and finish carpentry.
One of the biggest variables in that range is paint. A gel-coat finish (typically white or a standard color that doesn't match the van) is the base option. Color-matched paint, where the top is sprayed to blend seamlessly with the van's factory color, adds meaningful cost because it involves a separate paint shop, additional handling and preparation, and more precision. Gel-coat finish can also have significant imperfections and blemishes, and require frequent maintenance. We don't recommend the gel-coat, but it is an option if budget makes it necessary.
When people compare pop-top pricing to, say, adding a roof rack or a rooftop tent, the disconnect makes sense. Those are bolt-on accessories. A pop-top installation is closer in scope to a structural renovation. You're modifying the vehicle's body, coordinating with multiple specialty shops, integrating new mechanical and electrical systems, and finishing everything to a standard that needs to hold up at highway speeds and in heavy rain for years.
What to Know Before You Commit
A pop-top is a permanent modification. The roof cut can't be undone. That's worth sitting with for a moment before you start.
Your van should be the right van. A pop-top installation on a van you're not sure about is an expensive way to learn you wanted a different vehicle. If you're still deciding between platforms, work through that decision first. Which Camper Van Is Right for You? covers the major platforms and what each one is best suited for.
Know what you'll actually use. The 80/20 rule of van design applies here. If you're camping solo and rarely need a second sleeping area, a pop-top might be solving a problem you don't have. If you're a family of four trying to fit into a garageable vehicle, it might be the only thing that makes the whole plan work.
The top needs care. Canvas tent fabric needs to be dry before the top is closed for extended storage. Zippers, gaskets, and lift hardware should be inspected periodically. The maintenance is light, but it's real. Owners in humid or rainy climates should be especially attentive to moisture.
Be aware of the timeline. Between the van prep, the top fabrication and painting, the installation, and the finishing work, a pop-top installation is measured in weeks, not days. If your shop is coordinating with outside fiberglass and paint specialists (as most do), the calendar depends on more than just shop time.
A pop-top conversion is one of the more significant things you can do to a vehicle. Understanding what it takes, both in terms of the work involved and the investment required, puts you in a much better position to have a productive conversation with any shop you're considering. If you're further upstream and still trying to figure out whether a van conversion is right for you at all, A First-Time Buyer's Guide to Camper Vans is a good place to start.
Want to talk it through?
If you've been thinking about a pop-top, the best next step is a conversation about your specific van. The platform, the year, how you plan to use it, whether it needs to fit in your garage. Those details shape everything from the timeline to the cost.
Most of these conversations start the same way: "Here's what I'm working with. What makes sense?" That's the right place to start.
Call us at 888-332-9602 or send us a message here
Stay in the loop
Our newsletter is where we share what we're learning, thinking about, and building at the shop. Platform insights, practical advice, and the kind of detail that tends to matter more over time.
No hype. No spam. Just useful perspective from people who do this every day.
Subscribe to the GTRV newsletter
If you're still in research mode, these are good next steps:
High Roof vs Pop Top: How to Decide
